Monday, April 8, 2013

Weekend Mishaps and Confessions

So over the weekend I had been planning on going on a chiffon cake recipe marathon.  I was going to try baking 5-7 different chiffon cakes.  But then I got a call from my mother, who told me that I was commissioned to bake a large celebration cake for my church's event.  I also knew I was supposed to bake something for my mother's dinner guests the coming Monday.  So I ended up cancelling my long-awaited chiffon marathon, and moved on to planning the cakes.


I ended up baking a chocolate/vanilla layered cake for the church celebration. I used my chocolate cake and vanilla cake recipe to do this, along with my buttercream icing recipe.  


I baked 2 chocolate cakes and 4 vanilla cakes in order to make this downright huge cake.  It took me a total of 6 hours to finish this cake.  I brushed a sugar water coating on all layers to keep them moist, then added a thin layer of frosting.  


I had no idea how I wanted to decorate this cake, and later I found out that the cake height was just a little too tall for the cake box I bought.  So I decided on a simple chocolate curls topping.  The cake fit well, and was delivered successfully. I had a few mistakes here and there, including cracks in the cake, but nothing frosting can't fix.


Then on Sunday evening I finished baking a tiramisu cake for my mother's guests.  Its the same tiramisu cake I baked last week.  There were only two differences in this tiramisu and the one from last week.  First is that I ran out of chocolate when I used it all up for the celebration cake.  Second, is that I really disliked the recipe the book gives for the cake part of the tiramisu.  The cake part, after being in the fridge overnight, was slightly hard and stiff, even after hours of being left out of the fridge.  


So this time I used a basic chiffon recipe for the cake (that I will post later), that way the cake would keep moist and soft.  The tiramisu cake I made this time was much better in flavour and texture than the last.

Wednesday, April 3, 2013

Red Rose Chiffon Cake


I made another cake right after I finished making my green tea chiffon cake.  The original recipe calls for Earl Grey tea, but I only had Red Rose on hand.  The instructions were clear and was really easy to follow.  The cake came out beautifully.  It was light and fluffy and the height of the cake didn't shrink drastically.


Red Rose Chiffon Cake:
Adapted from Honey Bee Sweets
Makes one 20-cm tube cake


  • 5 egg yolks
  • 30g caster sugar
  • 1/2 tsp salt
  • 80mL vegetable oil
  • 30g Red Rose tea leaves or 3 sachets
  • 2 sachets of tea
  • 180mL water
  • 120g cake flour
  • 2/3 tsp baking powder
  • 5 egg whites
  • 90g caster sugar

  1. In a small saucepan, pour the water and place the leaves/sachets.  Heat until it boils, then turn the heat off and leave the tea to soak for 5-10 minutes.
  2. Preheat the oven to 170C or 338F.
  3. In a medium-large bowl, beat the egg yolks and sugar (30g) together until slightly thick and pale.
  4. Slowly drizzle the oil and mix.
  5. Pour 100mL of the tea (cooled) and mix until smooth.  Add in the tea grains of two more sachets and mix.
  6. Sift in the cake flour, salt and baking powder.  Mix until there's no more lumps.
  7. In a mixing bowl, beat the egg whites on medium-high speed until frothy and foamy.  Then gradually add in the sugar (90g).  Beat on high speed until stiff peaks form.
  8. Put a large dollap of the egg whites into the yolk mixture, and fold together quickly and neatly.  Add this mixture to the rest of the egg whites, and fold gently and carefully.
  9. Pour into a tube pan and spread out evenly.  Tap against a counter to remove air bubbles.
  10. Bake for 30-40 minutes or until a toothpick comes out cleanly.
  11. Garnish with fruits and sifted caster sugar if wanted.  Serve immediately.  Cake should be soft and fluffy.

Green Tea Chiffon Cake


Today I finally received my new digital kitchen scale and two piece tube pan in the mail.  Of course, I have to check if they're faulty or not, right?  So I went and baked a green tea chiffon cake.  The pan was absolutely amazing.  Its a non-stick aluminum heavy-duty pan (to prevent dents).  The cake came out cleanly and smoothly.  It was a bit small since the recipe was for an 18-cm pan whereas mine is 22cm.


The cake itself was extremely soft and fluffy.  The only thing I disliked about the cake was that the green tea powder I have on hand is really strong, and I didn't take that fact in when I measured the ingredients.  The flavour was a bit strong and sharp, instead of tasting light and refreshing.  I'll be cutting the amount of green tea powder I use next time I bake this.  Though if you own a natural, high-quality green tea powder, following the recipe the way it is, is fine.


Green Tea Chiffon Cake:
Adapted from Green Cilantro
Makes one 18-cm tube cake


  • 3 egg yolks
  • 40g caster sugar
  • 100g cake flour
  • 1 tsp baking powder
  • 1/8 tsp salt (or a pinch)
  • 2 tbsp green tea matcha powder
  • 50mL vegetable oil
  • 75mL water
  • 3 egg whites
  • 40g caster sugar

  1. Sift the cake flour, baking powder, salt and green tea powder together; set aside.  
  2. Place egg yolks in a medium-large bowl and add the sugar (40g).  Whisk until it becomes pale and sticky.
  3. Drizzle in the oil, whisking until fully incorporated.  Do the same with the water.
  4. Add in the flour mixture and mix until fully wet.
  5. In a mixing bowl, beat the egg whites on medium-high speed until it becomes frothy and foamy.  Gradually beat in the sugar (40g), then beat on high speed until stiff peaks form.
    1. TIP: Egg whites are stiff when you can hold the howl upside down.  
  6. Add in a large dollap of the egg whites into the yolk mixture.  Fold together quickly and gently.  Then add the mixture to the rest of the egg whites and fold together gently and carefully.
  7. Pour the batter into an ungreased 18-cm tube pan.  Spread the batter evenly, then tap the pan against the counter to rid of air bubbles.  
  8. Bake in the oven for 35-45 minutes or until you poke a cake with a toothpick and it comes out cleanly.
  9. After you remove it from the oven, invert the pan and place the center of the pan on a can or cup.  Leave until the pan is cool to the touch.  Take a blunt knife and run it along the sides of the pan.  If the pan is a two-piece, take the bottom out then run the knife again along the bottom, then carefully slide the cake out upside-down.
  10. Garnish with fruits and sifted caster sugar if wanted.  Serve right away.
    1. TIP: You will know if the cake came out correctly if you press the cake and it springs back.  Should be fluffy and light.

Monday, April 1, 2013

Yogurt & Berries


This is a wonderful breakfast snack when you're in a hurry and need to prepare something quick.  It's healthy and has a refreshing taste.  A perfect snack before morning jogs and for early risers.

While I used frozen fruits, fresh berries are more ideal.  You can find frozen berries in your local grocery store in the frozen food section.

Yogurt & Berries:
1 serving
  • 1 C yogurt of your choice (plain or vanilla is recommended)
  • 3-4 heaping tbsps of frozen or fresh berries

Sunday, March 31, 2013

Tiramisu Cake


Last night I made this tiramisu cake for my church's Easter potluck.  I wanted to make something fancy only the adults would eat, since the children usually has dibs on the dessert table.  So I made this tiramisu cake with rum, so only adults could eat it.

I got this recipe from the dessert cookbook my friend got me for my 18th birthday.  It's a cookbook by Williams Sonoma, and all the recipes comes with fully coloured photos.


The only thing with this recipe, and I'm not too sure if it's because I did something wrong along the way, but the recipe this book gives for the cake part of the tiramisu (ladyfingers aren't used for this), the cake is really spongey when it first comes out of the oven, but when I tasted the cake the next morning, the cake was a little hard.  Next time I'll be using my own recipe for the cake.

The tiramisu came out extremely smooth and creamy, and it was rich in taste.  Though this book doesn't particularly indicate what type of mixer/beater to use, I highly recommend using a stand mixer instead of a hand-held one.  Some parts of this recipe requires beating for amounts of time that would be tiring if done by hand.  In fact, when I first made the cake part of this recipe, I used a hand-held mixer, and the cake came out hard and flat.  The second time I used my stand mixer, and it came out just like the instructions indicated.


Tiramisu Cake:
Makes one 9-inch cake

Cake:
  • 1 C all-purpose flour
  • 3/4 tsp baking powder
  • 1/4 tsp salt
  • 4 eggs at room temperature
  • 2/3 C sugar
  • 1 1/4 tsp vanilla extract

Syrup:
  • 1/2 C water
  • 1/3 C sugar
  • 2 tbsp dark rum or coffee liqueur
  • 2 tsp instant espresso or coffee powder

Filling:
  • 6 egg yolks
  • 1/3 C sugar
  • 1/4 C dark rum or coffee liqueur
  • 1 tbsp instant espresso or coffee powder
  • 1/2 C heavy (double) cream
  • 1 1/2 C (375g) mascarpone cheese
  • 1 1/2 tsp vanilla extract

Garnish:
  • Chocolate curls
  • Unsweetened cocoa powder

  1. Preheat the oven to 350 degrees FahrenheitLightly grease the bottom of a 9-in round cake pan and line it with parchment paper.  Lightly grease he paper and sides of the pan and then dust with flour.
  2. To make the cake, in a bowl, whisk together the flour, baking powder, and salt until blended.  In a large bowl, using a mixer on medium-high speed beat the eggs until pale and thick, about 3 minutes.  Add the sugar and vanilla and continue beating until very thick and tripled in volume, about 3 minutes.  Sprinkle the dry ingredients over the wet ingredients and, using a rubber spatula, fold gently until blended.
  3. Pour into the pan and spread evenly.  Bake the cake until it springs back when lightly touched, about 30 minutes.  Let cool for 15 minutes.   Run a small knife around the inside of the pan to loosen the cake.  Invert onto a cooling rack and lift off the pan.  Let the cake cool completely.
  4. To make the syrup, combine the water and the sugar in a small saucepan and cook over medium heat, stirring frequently, until the sugar dissolves.  Bring to a boil and remove from the heat.  Stir in the coffee liqueur and espresso powder.  Set aside and cool to room temperature.
  5. To make the filling, in the top of a double boiler, whisk together the egg yolks, sugar, coffee liqueur, and espresso powder.  Set over barely simmering water and beat with the mixer set on medium speed until very thick, about 6 minutes.  Remove the top of the double boiler from the heat and set aside to cool, stirring frequently.
  6. Meanwhile, in a bowl, using the mixer on medium-high speed, beat the cream until stiff peaks form when the beaters are lifted.
  7. When the yolk mixture is cooled to room temp, add the mascarpone and vanilla.  Beat until smooth and well blended.  Using the rubber spatula, fold in the whipped cream.
To Assemble:
  1. Cut the cake horizontally into 2 or 3 equal layers.  Remove the bottom of a 9-inch springform pan, or use a cake mould, and set on a serving plate.
  2. Place 1 cake layer in the ring.  Generously brush and sprinkle with some of the syrup. Scoop about 1 3/4 C of the filling onto the layer and spread evenly.
  3. Repeat step 2 until you placed all the cake layers and filling into the ring.
  4. Holding the ring and plate together, gently tap against the counter to settle the ingredients.  Cover with plastic wrap and refrigerate for at least 6 hours or overnight.
  5. To serve, run a thin knife around the inside of the ring to loosen the cake.  Remove the ring by unclasping the pan, or by slowly pulling the ring up.  Garnish with chocolate curls, then sift a dusting of cocoa over the top.

Saturday, March 30, 2013

Green Tea Mousse Cake


Last weekend I finally bought the ingredients for this matcha green tea mousse cake.  I couldn't find the match green tea powder in any of the local grocery stores, so I stopped by the Chinese supermarket, T&T for it.  This was my first time using green tea powder in a recipe, and I was thrilled by how great this came out.  Now I'm trying to explore different green tea desserts.  I've made green tea iced lattes and shakes, and I plan on baking a green tea chiffon cake later this month.

The mousse came out really smooth and creamy, and the jelly coating added a nice touch to the texture of this cake.  I actually had to redo this recipes twice since it is originally written in grams, and I don't own a scale.  So it took me some time to convert the measurements to cups and tablespoons, and the inexact measuring caused me to mess up quite often.  I was able to dig up enough money to buy a proper digital kitchen scale (a Soehnle), and it's supposed to come in next week, so I'm really excited.  With a scale, I'll be able to try out more foreign recipes, especially European desserts.

You don't have to garnish this cake.  You can just leave it as it is, and maybe sprinkle some extra green tea powder or even icing sugar.  I had extra whipped cream and fruits, so I just went ahead and decorated mine.


Green Tea Mousse Cake:
Adapted from kikaching888 Link

Chiffon Cake: (12 cm cake tin)

  • 1 egg
  • 20 g caster sugar
  • 25g cake flour
  • 15 mL oil (vegetable or canola)
  • 20 mL water
  • 1 tsp vanilla extract


Mousse:

  • 100 mL whipped cream
  • 100 mL milk (at least 2%)
  • 100 g yogurt (try getting thicker yogurt, like Greek yogurt)
  • 35 g honey
  • 1 tbsp matcha green tea powder
  • 1 tbsp gelatin
  • 2 tbsp hot water


Jelly Topping:

  • 1/2 tsp gelatin
  • 2 tbsp hot water
  • 1 tsp match green tea powder

  1. Separate the egg yolk and the egg white into separate bowls.  Beat the egg white until it becomes foamy (about 2 min.), then add in 10g of the caster sugar.  Beat until the mixture forms stiff peaks.
    1. TIP: You will know when the mixture is stiff if you can hold the bowl upside down and nothing falls out.
  2. In the bowl with the egg yolk, add in the rest of the caster sugar (10g), water, oil, and the vanilla extract.  Sift in the cake flour.  Whisk all the ingredients together until you get a smooth, watery mixture.
  3. Add the egg white mixture into the batter, and fold together gently until fully incorporated.  Pour the batter into the cake tin lined with parchment paper and tap the tin a few times against the counter.  Bake in a 350 degree Fahrenheit oven for approximately 25 minutes.  After it's done baking, let it cool upside down on a cooling rack.
  4. In a saucepan under low heat, whisk together the milk, honey and green tea powder until fully dissolved.  Then pour it through a strainer into a medium-large bowl.  This will get rid of the lumps.  Place in the fridge to cool.
  5. In another bowl, whisk the whipped cream until it forms medium-soft peaks.  Then carefully fold in the yogurt.
  6. Add the whipped cream mixture into the cooled green tea mixture, and fold them together gently to make a smooth, creamy mixture.
  7. Pour the gelatin in a small bowl, then add the hot water.  Mix until the gelatin fully dissolves.  Add this to the mousse mixture, and fold in gently.
  8. Take your cake and cut it in half.  Then place one layer at the bottom of your moulding tin.  Add in half of the mousse mixture, and smooth it out evenly.  Then add in the second layer, and pat it gently on top.  Add in the rest of your mousse, and smooth it out evenly.
    1. TIP: If your moulding tin has a bottom, tap the whole tin against the counter.
  9. Wrap the tin in plastic wrap and place it in the fridge for at least 4 hours, or overnight.
  10. After you take the cake out, pour the gelatin in a small bowl and add the hot water.  Then add in the green tea powder.  Mix until fully dissolved.  Pour this on top of your cake, then rewrap it and leave it in the fridge for another hour.
  11. If your moulding tin has a bottom, place the tin on top of the pan and push the sides of the mould downwards.  Your cake should come out cleanly.  If your mould does not have a bottom and you used a plate or cake board, simply slide the tin upwards, doing it slowly and gently so it won't break the mousse.
  12. You can garnish your cake with whipped cream and fruits, or you can just sprinkle it with green tea powder or caster sugar.  Serve fresh.

Thursday, January 24, 2013

PANCAKES

So I found this awesome pancake recipe one morning.  I usually dislike pancakes and prefer waffles, but this recipe is so amazing.  :)

Pancakes:

- 3/4 C milk
- 2 tbp white vinegar (I use white wine vinegar)
- 1 C flour
- 2 tbp white sugar
- 1 tsp baking powder
- 1/2 tsp baking soda
- 1/2 tsp salt
- 1 egg
- 2 tbp butter, melted
- 1 tsp vanilla (optional)
- fruits of your choice (I use sliced bananas.  This is optional)


  1. Combine milk with vinegar in a medium bowl and set aside for 5 minutes to "sour".
  2. Combine flour, sugar, baking powder, baking soda, and salt in a large mixing bowl. Whisk egg and butter into "soured" milk. Pour the flour mixture into the wet ingredients, do not over mix.  Add fruits and/or toppings to the batter.
  3. Heat a large skillet over medium heat, and coat with cooking spray. Pour 1/4 cupfuls of batter onto the skillet, and cook until bubbles appear on the surface. Flip with a spatula, and cook until browned on the other side.


Tips:
- As it said in the instructions, do not over whisk.  The lumps make the pancakes fluffy.
- Do not be afraid to use vinegar.  I guarantee it does not make your pancakes smell or taste sour.
- Soured milk is the substitute for buttermilk.  You can use either.


Original Link: http://allrecipes.com/recipe/fluffy-pancakes-2/detail.aspx?event8=1&prop24=SR_Title&e11=pancakes&e8=Quick%20Search&event10=1&e7=Home%20Page

Sunday, January 20, 2013

GERMAN CHOCOLATE CAKE FROSTING

Hey guys!  I know its been a completely long time, but I do have a few new recipes to put up!  With my new imac (that I got in just yesterday), I can finally start typing again (my laptop broke 6 months ago).  I'll be starting off with this German chocolate cake frosting recipe.  It's so delicious, that its a must.  Enjoy! :)

German Chocolate Cake Frosting:

1 C evaporated milk
1 C white sugar
3 egg yolk, beaten with 1 tsp water
1/2 C margarine
1 tsp vanilla extract
1 C chopped pecans (can be substituted with sliced pecans or chopped walnuts)
1 C flaked coconut (if you want to leave this out, its okay, the frosting still comes out great!)


In a large saucepan combine evaporated milk, sugar, egg yolks, margarine and vanilla.  Cook over low heat, stirring constantly, until thick.  Remove from heat and stir in pecans and coconut.  Spread on cake while still warm.


Tips:
- For better flavour, you can toast your pecans and coconut flakes in the oven for 5 minutes at 350 F, or in a mini toaster oven.

- For those having trouble with the thickening of the frosting, add 1 tbp of cornstarch.

- You can also raise the heat up and stir vigorously if you do not want to add cornstarch.


Original Link:
http://allrecipes.com/recipe/german-chocolate-cake-frosting-ii/detail.aspx?event8=1&prop24=SR_Title&e11=german%20chocolate%20cake&e8=Quick%20Search&event10=1&e7=Recipe

Tuesday, August 14, 2012

CHOCOLATE FROSTING


CHOCOLATE FROSTING:

1/2 cup (1 stick) butter or margarine
2/3 cup HERSHEY'S Cocoa
3 cups powdered sugar
1/3 cup milk
1 teaspoon vanilla extract


Melt butter. Stir in cocoa. Alternately add powdered sugar and milk, beating to spreading consistency. Add small amount additional milk, if needed. Stir in vanilla. About 2 cups frosting.

BUTTERCREAM ICING


VANILLA FROSTING:

-1/2 cup unsalted butter, softened (I used margarine)
-1 1/2 teaspoons vanilla extract
-2 cups confectioners' sugar, sifted
-2 tablespoons milk
-4 drops food coloring, or as needed (optional)


1. Cream room temperature butter with a hand mixer, the paddle attachment of a stand mixer, or a wooden spoon until smooth and fluffy. Gradually beat in confectioners' sugar until fully incorporated. Beat in vanilla extract.

2. Pour in milk and beat for an additional 3-4 minutes. Add food coloring, if using, and beat for thirty seconds until smooth or until desired color is reached.

Tips:
-If you prefer to use just frosting to cover the cake instead of whip cream, add more milk so the frosting is more smooth and easier to spread.

-If you make the frosting more firm (less milk), decorations will also be more firm after it's chilled and less prone to being ruined by touch.

CHOCOLATE CAKE


So here's the chocolate cake recipe.  I'll be putting up the buttercream icing recipe up next.


CHOCOLATE CAKE:

-2 C sugar
-1 3/4 C all-purpose flour
-3/4 C HERSHEY'S Cocoa
-1 1/2 tsp baking powder
-1 1/2 tsp baking soda
-1 tsp salt
-2 eggs
-1 C milk
-1/2 C vegetable oil
-2 tsp vanilla extract
-1 C boiling water


1. Heat oven to 350°F. Grease and flour two 9-inch round baking pans.

2. Stir together sugar, flour, cocoa, baking powder, baking soda and salt in large bowl. Add eggs, milk, oil and vanilla; beat on medium speed of mixer 2 minutes. Stir in boiling water (batter will be thin). Pour batter into prepared pans.

3. Bake 30 to 35 minutes or until wooden pick inserted in center comes out clean. Cool 10 minutes; remove from pans to wire racks. Cool completely.

VANILLA CAKE

Hey guys, it's been a while sine I've last posted.  I've been baking a bit in the last few weeks so I'll be putting up some new recipes, including a new banana bread recipe to replace the one I currently have.

So I'm just posting the recipe for vanilla cake because it's originally on another post, under "DOLL CAKES", but that was one of my first posts on this blog, so I put 4 recipes on one post, which makes it harder for me, and maybe others, in reaching the individual recipes.  The 4 recipes were vanilla and chocolate cake, and buttercream and chocolate frosting.  This is the vanilla cake post, enjoy.  :)


VANILLA CAKE:

-1 1/2 C all purpose flour
-1/2 C butter or margarine (softened)
-1 tbp vanilla extract
-2 eggs
-1 3/4 tsp baking powder
-1/2 C and extra 1/8 C milk (as suggested from others)
-1 C sugar
-food colouring (optional)


1. Preheat oven to 350°F. Grease the pans with butter or oil and coat with flour

2. Sift together the flour and baking powder in a separate bowl and set aside.

3. Make sure your butter or margarine is room temperature or softened. Cream the butter than add the sugar and cream some more. In small bowl, whisk/beat each egg one at a time and add each egg into the cream and sugar mix separately. Then add in the vanilla extract.

4. Add the dry ingredients mixture into the wet ingredients until all the ingredients are wet, add milk and stir.

5. Next pour the batter into a pan (if you chose to use more than one colour, bake in separate pans for each). Bake for about 20 min to 30 min, or when a toothpick comes out clean after being inserted into the cake. Let it cool.

Tips:
-If your butter is straight from the fridge and is hard, try microwaving it for at least 20 sec.

-If you use colouring, the colour of the cake will come out of the oven slightly lighter than it looked before as a batter.

Saturday, June 9, 2012

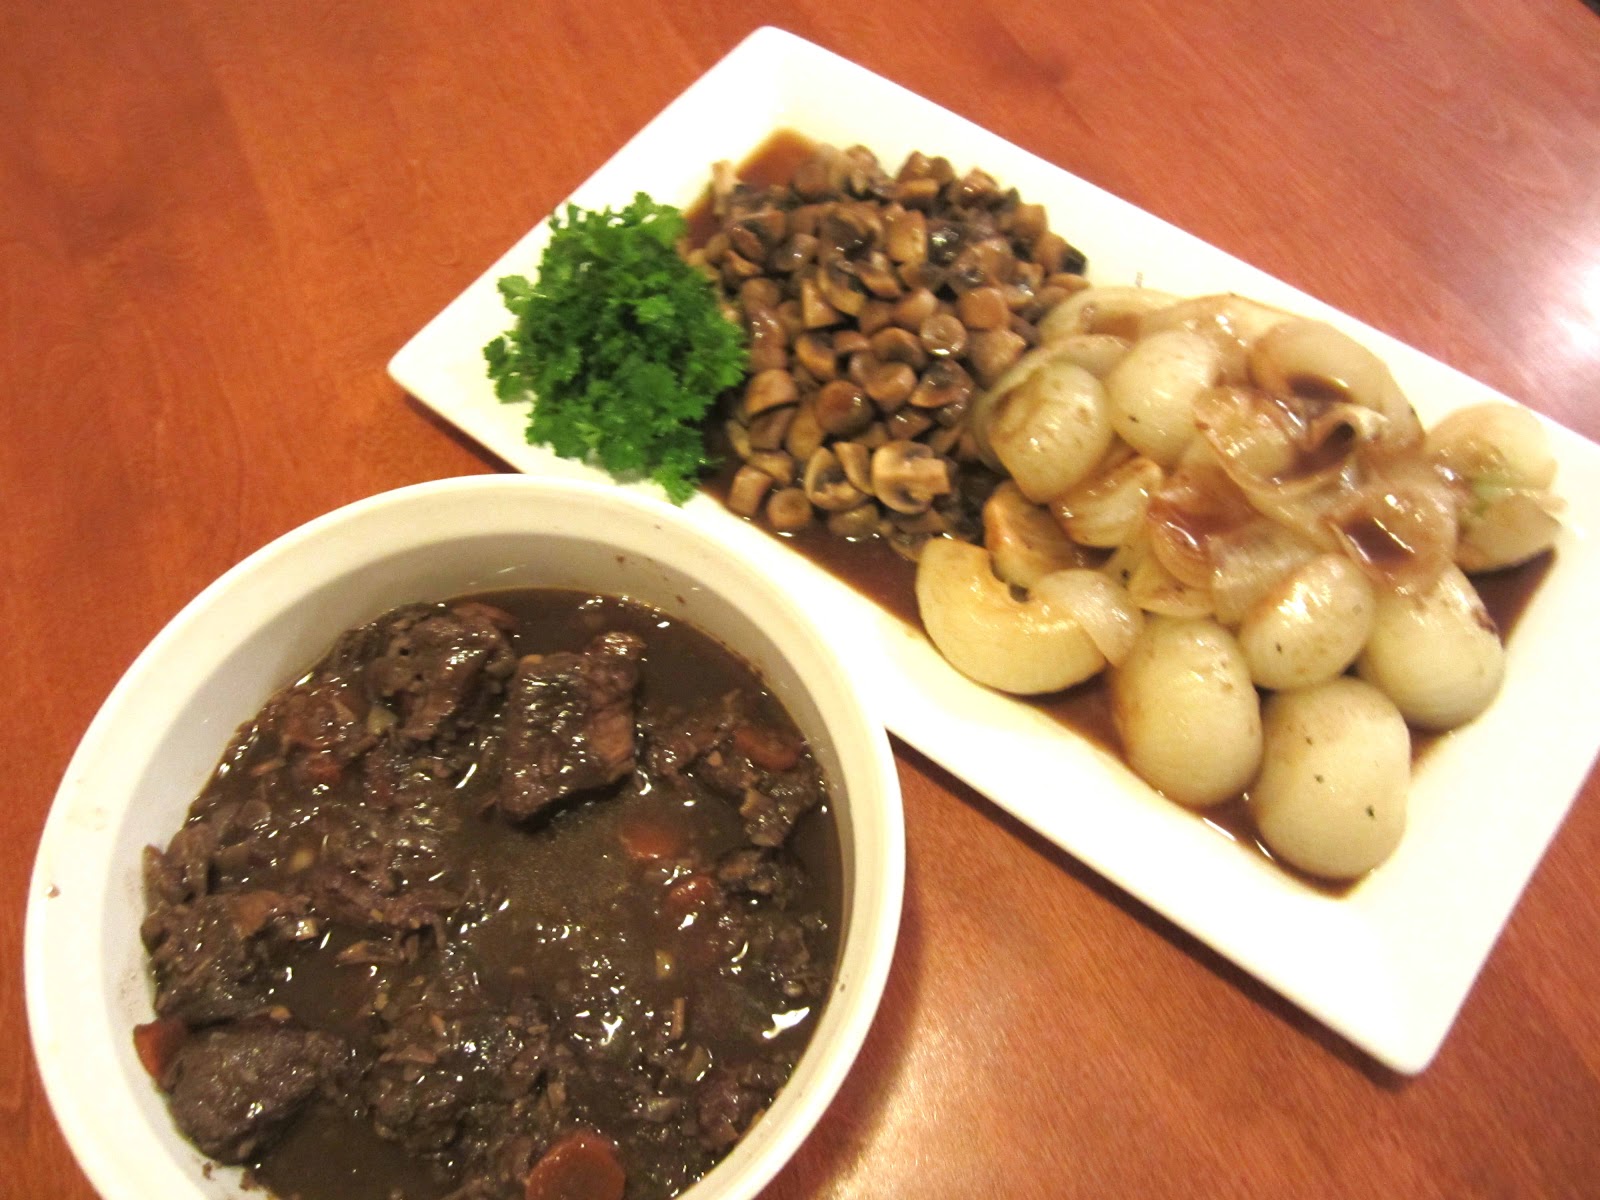
JULIA CHILD'S BOEUF BOURGUIGNON


A few months ago I challenged myself and took to making a French dish.  I don't usually do "fancy"cooking since baking is more of my passion, but after watching the movie Julie and Julia (based off of a novel by Julie Powell who wrote on how Julia Child's life had changed her's), I was inspired to take a look at Julia Child's cookbook.  The one recipe that stood out in the movie was boeuf bourguignon, so choose that dish to make.  This dish is for intermediate cooks, but for me, who has not cooked that much, it was difficult.  The directions are so easy, but actually cooking was hard.

Anyways, here's the original recipe for boeuf bourguignon:


Boeuf Bourguignon/ Boeuf a la Bourguignonne
[Beef Stew in Red Wine, with Bacon, Onions, and Mushrooms]

As is the case with most famous dishes, there are more ways than one to arrive at a good boeuf bourguignon.  Carefully done, and perfectly flavored, it is certainly one of the most delicious beef dishes concocted by man, and can well be the main course for a buffet dinner.  Fortunately you can prepare it completely ahead, even a day in advance, and it only gains in flavor when reheated.

Vegetable and Wine Suggestions
Boiled potatoes are traditionally served with this dish.  Buttered noodles or steamed rice may be substitued.  If you also wish a green vegetable, buttered peas would be your best choice.  Serve with the beef a fairly full-bodied, young red wine, such as Beaujolais, Cotes du Rhone, Bordeaux-St. Emilion, or Burgundy.

For 6 people

Ingredients:
A 6-ounce chunk of bacon
A 9- to 10-inch fireproof casserole 3 inches deep
1 Tb olive oil or cooking oil
A slotted spoon
3 lbs. lean stewing beef cut into 2-inch cubes (see preceding list of cuts)

1 sliced carrot
1 sliced onion
1 tsp salt
1/4 tsp pepper
2 Tb flour

3 cups of a full-bodied, young red wine such as one of those suggested for serving, or a Chianti
2 to 3 cups brown beef stock or canned beef bouillon
1 Tb tomato paste
2 cloves mashed garlic
1/2 tsp thyme
A crumbled bay leaf
The blanched bacon rind

18 to 24 small white onions, brown-braised in stock
1 lb. quartered fresh mushrooms sauteed in butter

Parsley sprigs

                                                      
Remove rind, and cut bacon into lardons (sticks, 1/4 inch thick and 11/2 inches long).  Simmer rind and bacon for 10 minutes in 11/2 quarts of water.  Drain and dry.
                                                     
Preheat oven to 450 degrees.
                                                     
Saute the bacon in the oil over moderate heat for 2 to 3 minutes to brown lightly.  Remove to a side dish with a slotted spoon.  Set casserole aside.  Reheat until fat is almost smoking before you saute the beef.
                                                     
Dry the beef in paper towels; it will not brown if it is damp.  Saute it, a fwe pieces at a time, in the hot oil and bacon fat until nicely browned on all sides.  Add it to the bacon.
                                                     
In the same fat, brown the sliced vegetables.  Pour out the sauteing fat.
                                                     
Return the beef and bacon to the casserole and toss with the salt and pepper.  Then sprinkle on the flour and toss again to coat the beef lightly with the flour.  Set casserole uncovered in middle position of preheated oven for 4 minutes.  Toss the meat and return to oven for 4 minutes more.  (This browns the flour and covers the meat with a light crust.)  Remove casserole, and turn oven down to 325 degrees.
                                                     
Stir in the wine, and enough stock or bouillon so that the meat is barely covered.  Add the tomato paste, garlic, herbs, and bacon rind.  Bring to simmer on top of the stove.  Then cover the casserole and set in lower third of preheated oven.  Regulate heat so liquid simmers very slowly for 2 1/2 to 3 hours.  The meat is down when a fork pierces it easily.
                                                      
While the beef is cooking, prepare the onions and mushrooms.  Set them aside until needed.
                                                      
When the meat is tender, pour the contents of the casserole into a sieve set over a saucepan.  Wash out the casserole and return the beef and bacon to it.  Distribute the cooked onions and mushrooms over the meat.
                                                      
Skin fat off the sauce.  Simmer sauce for a minute or two, skimming off additional fat as it rises.  You should have about 2 1/2 cups of sauce thick enough to coat a spoon lightly.  If too thin, boil it down rapidly.  If too thick, mix in a few tablespoons of stock or canned bouillon.  Taste carefully for seasoning.  Pour the sauce over the meat and vegetables.
(*) Recipe may be complete in advance to this point.
                                                       
FOR IMMEDIATE SERVING: Cover the casserole and simmer for 2 to 3 minutes, basting the meat and vegetables with the sauce several times.  Serve in its casserole, or arrange the stew on a platter surrounded with potatoes, noodles, or rice, and decorated with parsley.
                                                       
FOR LATER SERVING: When cold, cover and refrigerate.  About 15 to 20 minutes before serving, bring to the simmer, cover, and simmer very slowly for 10 minutes, occasionally basting the meat and vegetables with the sauce.


Friday, June 8, 2012

BABY'S CHRISTENING CAKE


Wow, it's been a long time since my last post.  March I think.  Since then, I haven't been able to bake too much, or I'm baking the same things.  But recently, I was asked to bake cakes for a baby's christening.  Now, I'm not a Christian, so I don't really know how they work.  But I figured it'd be similar to a baptism (no, I'm not Catholic or whatever religion that uses baptism).  So in other words, the cakes should be fancy.  At least, to the best of my abilities.

That's why I started looking up on how to make roses out of icing.  Well actually, I've been studying rose-making videos for a long time now, but this was the first time I really needed it.  And let me tell you, during the time I practised for this cake, I discovered I have absolutely no talents in the decorating dept.  It's like I was starting baking from scratch, from level 1.  Anyway, I was finally able to make decent roses, but it's not that great.

Here's some photos of the cake (I only took photos of one of them because they both have the same design):


I baked 8 CAKES in total and put them together to make two huge cakes.


Sunday, March 11, 2012

GINGERSNAP LOGS


So here's the recipe for the gingersnap logs I made yesterday.  This recipe was found from the CHRISTMAS COOKIES edition of Better Homes and Gardens Special Interests magazine.

*See photo gallery for more photos* http://slice-of-cake.blogspot.ca/p/photo-gallery.html

Gingersnap Logs:
11/4 C crushed gingersnaps
1/2 C powdered sugar
1/3 C sweetened condensed milk
1 tbp molasses, or 11/2 tsp rum or coffee liqueur
11/2 tsp vanilla
1 tsp ground cinnamon
3 oz white chocolate baking squares with coca butter, chopped
1 C canned vanilla frosting
Red decorative sugar


Prep. 45 minutes
Stand: 30 minutes
Chill: 1 hour


1. In a food processor combine 1 cup of the crushed gingersnaps, the powdered sugar, sweetened condensed milk, molasses, vanilla, and cinnamon.  Cover and process until well combined.  Transfer to a bowl; stir in remaining crushed gingersnaps.  Cover and chill for 1 hour or until the dough is easy to handle.

2. Line an extra-large baking sheet with waxed paper; set aside.  Shape a rounded teaspoonful of dough into a 1X1/2-inch log.  Place on prepared baking sheet.  Repeat with remaining dough.

3. In a small saucepan cook and stir white chocolate over low heat until chocolate melts.  Add frosting; heat and stir until mixture is smooth.  Using a fork, dip logs, one at a time, into white chocolate mixture, allowing excess to drip off.  Return logs to waxed paper.  Sprinkle logs with red decorative sugar.  Let stand for about 30 minutes or until set.  Makes about 36 cookies.


TIPS: 
-Make sure you use exactly 1 cup or less crushed gingersnaps.  More will make it extremely hard for the dough to mix properly.

-I found the dough extremely hard to work with, even after chilled.  To make rolling easier, damp your hands with water and then roll.  But doing this makes the dough "melt" a little faster, and the friction from the rolling makes your hands raw.

-I didn't have molasses or rum or coffee liqueur.  Came out fine.

-I experimented on a baking sheet vs. a wired rack (to help with the access chocolate-frosting mix).  The baking sheet came out so much better.  Using the wired rack makes the logs sink into the wires.

-I found it hard to actually dip the log with a fork lodged into it.  Instead, I just dumped the logs two at a time into the mix (I had a small saucepan), and used the fork to wrap the logs into the mixture, then simply picked up the logs (not forked them).

-It really does take around 30 minutes to for it set.

-In my opinion, the recipe was horrible.  The mixture has doughy texture, cooled or not, and the chocolate-frosting mix was overly sweet and gross.  :P

Saturday, March 10, 2012

OATMEAL COOKIES


I'm on a complete baking spree this week.  Why?  MARCH BREAK!  Since I have no life other than baking and drawing, that is what I shall do to pass my time.  Earlier today I made ginger snap log cookies.  I'll be posting that up too.  Now I'm making oatmeal cookies.  Surprisingly, I believe this is my first time making them.  I love oatmeal cookies, but I don't think I've ever made them.  :P

OATMEAL COOKIES: 

  • 1 cup butter, softened
  • 1 cup white sugar
  • 1 cup packed brown sugar
  • 2 eggs
  • 1 teaspoon vanilla extract
  • 2 cups all-purpose flour
  • 1 teaspoon baking soda
  • 1 teaspoon salt
  • 1 1/2 teaspoons ground cinnamon
  • 3 cups quick cooking oats
nuts and/or raisins (optional)

Ingredient Tips:
Many reviewers said to cut the sugar by half.

  1. In a medium bowl, cream together butter, white sugar, and brown sugar. Beat in eggs one at a time, then stir in vanilla. Combine flour, baking soda, salt, and cinnamon; stir into the creamed mixture. Mix in oats. Cover, and chill dough for at least one hour.
  2. Preheat the oven to 375 degrees F (190 degrees C). Grease cookie sheets. Roll the dough into walnut sized balls, and place 2 inches apart on cookie sheets. Flatten each cookie with a large fork dipped in sugar.
  3. Bake for 8 to 10 minutes in preheated oven. Allow cookies to cool on baking sheet for 5 minutes before transferring to a wire rack to cool completely.


TIPS:
-Again, I cut the sugar by half and it came out fine.  It's plenty sweet even cut half.

-Many people said that you don't need to flatten the cookies with sugar.  Just keeping them in a ball form is fine, and will come out with fatter and chewier cookies.  Came out so nice.


Links:

Monday, February 20, 2012

MY TRIP TO NIAGARA FALLS DEC. 2011

Yea I know this is really late, but here are some of the photos from my trip 2 months ago.  My dad comes over to Ontario once a year from Vancouver, during winter break.  Why?  Because my dad works there (no, my parents are not divorced).  Anyways, we saw some cool stuff there. :)


m